|
ALL NEW Bowkaddy Bow Kovers
Have Arrived!
"The Latest Installment" - F-350 Crew Cab Interior Side Mount
Dealer
Update
Did you hear the good news?!... The days are getting shorter...and you
know what that means...
As of today there are only 46 more sleeps until Christm...uh, I mean bowhunting
season. At least that's how the calendar reads here in my neck of the
woods. Visions of broadheads and broadside shots have been dancing in my
head ever since the summer solstice. How about you? Got the itch
yet? Picked out your hunting destinations? Booked your holidays?
Scoped out some new gear for the upcoming season? How's that for a subtle
lead-in to the latest offering by Bowkaddy...a new and improved soft bow cover to protect your
bow from mud, dust and trail debris...
Bowkaddy Bow
Kovers Have Arrived!
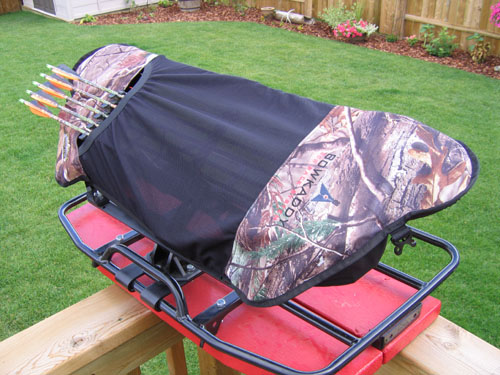 My very
first e-newsletter back in September '06 featured a product called the Bow-Kini.
The "Bow-Kini Solution", as I referred to the setup, was a simple yet
aesthetic
soft bow cover manufactured by Black's Creek Guide Gear and endorsed by Mathews.
The problem it solved was the frequent bombardment of mud, dirt and trail debris
landing on the bow. With the bows of old, people were more likely to allow
a little spattering of mud on the weapon now and then. Not so much anymore.
With equipment prices steadily on the rise, a little insurance goes a long way
to preserve today's hi-tech offerings. My very
first e-newsletter back in September '06 featured a product called the Bow-Kini.
The "Bow-Kini Solution", as I referred to the setup, was a simple yet
aesthetic
soft bow cover manufactured by Black's Creek Guide Gear and endorsed by Mathews.
The problem it solved was the frequent bombardment of mud, dirt and trail debris
landing on the bow. With the bows of old, people were more likely to allow
a little spattering of mud on the weapon now and then. Not so much anymore.
With equipment prices steadily on the rise, a little insurance goes a long way
to preserve today's hi-tech offerings.
I was thus elated to discover the Bow-Kini one day at a
local archery shop amidst a gathering of other cool camo products by the same
company. I bought it and tried it right away on the Bowkaddy set up.
"This is the ticket," I thought to myself, so I contacted Black's Creek and
secured a deal to sell their Bow-Kini as an accessory to my own product line.
Later I realized that this soft cover addressed another
pressing issue, at least in some states and provinces. In several
jurisdictions around North America, a bow must be "encased" during transport.
For years, this meant a bulky hard case that hogged space on quad racks and
often meant assembly time when you reached the end of the trail. I had a
later model PSE that wouldn't fit in my hard case unless I removed the two-piece
quiver. The time I spent fumbling with Allen keys and arrows..."I could be
in the stand by now," I often thought. With this soft cover came the
freedom to transport my bow, quiver and arrows intact without the hassle of a
hard case. And because it met the intent of the "cased bow" regulations, I
could use it anywhere my hunting destination turned out to be.
So
what has changed on the new Bowkaddy Bow Kover?
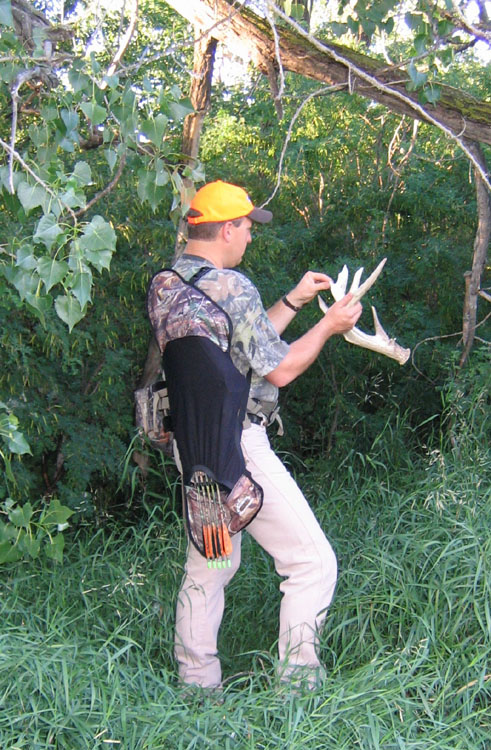
The short answer is...not a lot. The new cover is dimensionally identical
to the original Bow-Kini and is manufactured under the same rigorous standards
of quality. It is designed to slip easily over parallel limb
bows but, in my experience, will work for any bow up to about 40" total length.
The cover still provides maximum protection of the critical bow components -
cams, sight, rest, string and cable. As well, the narrow opening on the
front still provides for low-profile coverage even with quiver and arrows on the
bow.
 The key changes to the new Bow Kovers are: The key changes to the new Bow Kovers are:
-Embroidered
with the Bowkaddy logo instead of the Mathews logo, making the product more
brand-generic.
-Bow-Kini logo removed.
-Black's Creek Guide Gear logo added.
-Cool new snap connectors on the straps.
-Available in new camo patterns including Realtree AP.
-Zipper removed from back of cover (was used only in conjunction with some
Black's Creek backpacks).
The Bowkaddy Bow Kover is the perfect complement to any Bowkaddy system, be it
on an ATV, UTV, boat or pickup. The cover fits easily around the bow and
the swing arms of Bowkaddy when in use and keeps the bow clean and ready for
action. Even by itself, the Bow Kover can be extremely useful. Throw
it on your bow, adjust the carrying strap and throw it over your shoulder.
If you like your time in the woods, you'll like it even more the the Bowkaddy
Bow Kover. Click
here if
you are interested in purchasing a Bowkaddy Bow Kover. Note that, if
you're a Mathews fan, the original Bow-Kinis will be available for a short time
until the stock is used up.
"The Latest Installment" -
F-350 Crew Cab Interior Side Mount
Now this is cool. One day a local bowhunter called me up and inquired
about the use of Bowkaddy as an interior bow rack in his full size F-350 crew
cab pickup. "I always have my bow with me in the truck," he informed me,
"but I hate having it bouncing around the back seat." As it turned out, he was passing through Wainwright that
evening so I told him to stop by and check out the product first hand. To
shorten the story a bit, he left that evening with a custom-installed bow rack
just inside the back door on the drivers side.
Problem solved in fine fashion.
 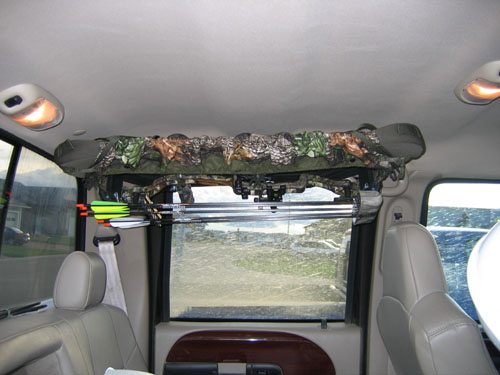
Granted, this is the most challenging install application for Bowkaddy and will
not work on every vehicle. First of all, you must be willing to give up
some headroom in the back seat when your bow is in the rack. The other,
and most important consideration, is that you must be able to bolt the base of
Bowkaddy in an integral location without drilling through the top of the roof.
This is only possible in locations where the presence of an adequate sub-plate
can be confirmed by peeling back the roof liner. An adequate sub-plate is
one in which at least three out of the four bolts can be fastened through the
sub-plate to secure the base. And of course, you need to confirm that your
bow will actually fit in the preferred location. Pre-planning is critical.
Once you've confirmed the availability of sufficient space and an integral
sub-plate, you can begin the physical installation. With the roof liner
peeled back, carefully mark the 3 or 4 hole positions on the bottom of the
subplate. If space is tight, just mark one hole to begin with. The
base can be used as a template later on to mark the remaining holes. A
small nail works good to create the matching hole in the liner. Errant
holes in the roof liner cannot be easily repaired or covered so take your time
and do it right the first time.
Unless the subplate thickness is heavy duty (~1/8" thick), the standard 5/16"
bolts will work better than the lag bolts. If using lag bolts, use a
15/64" bit; otherwise (and if the lag bolts don't hold the base securely), use a
21/64" bit. The tricky part about using the standard bolts is feeding them
down from the top of the sub-plate. I was able to do it quite easily by
tying a short length of fishing line to the bottom threads of the bolt and then
"fishing" the string up through the big hole (visible below left) and down
through the drilled hole. Be careful not to lose the bolt inside the roof
of the truck. I also recommend putting a lock washer on the bolt before
you fish it through to facilitate tightening after the base is placed.
After all, you won't have access to the top of the bolt to keep it from turning
when the nut is tightened on from the bottom. Once the holes are drilled
and bolts inserted, the worst is over. All that remains is to tuck the
roof liner back into position and fasten the Bowkaddy base.
In this install, the rear rubber handle above the window was sacrificed to
provide a suitable mounting location. This was preferable to messing with
the interior light in the rear middle location and in the end, turned out much
to our satisfaction.
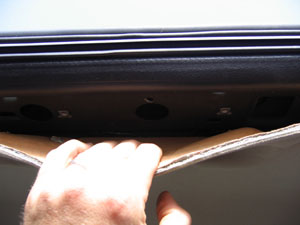   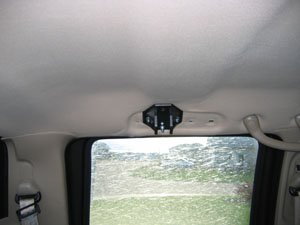
If you have any questions pertaining to an install such as this one, feel free
to contact Alaris Concepts.
Dealer Update
Alaris Concepts is happy to welcome the
following companies to the
Bowkaddy Dealer List. Please check them out if you are in the area!
Walleyes & Whitetails
4919-53 Avenue
High Prairie, AB T0G
1E0
780-523-0066
Triggers & Bows
1336 Colborne St W
Brantford, ON N3T 5L7
519-449-1001
www.triggersandbows.ca
Return to Bowkaddy
Bulletin Main Page
|


